User Guide
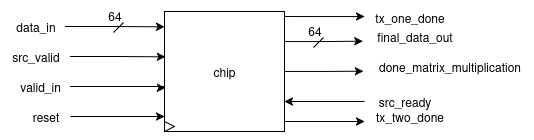
- The array takes an input of 64 bits and gives an output of 64 bits.
- This I/O is communicated using the bidirectional ready-valid protocol.
- The bits have a predefined format according to which they are received/transmitted.
Matrix Transfer Format [1st 2nd 3rd 4th ] [5th 6th 7th 8th ] [9th 10th 11th 12th] [13th 14th 15th 16th]
Input format:
- [63:32] → row (8 bits per element)[4 elements]
- [31:0] → column (8 bits per element)[4 elements]
Output format:
[2 × (32-bit elements)]
How to Give Input?
- Provide four chunks of 64-bit input where:
[63:32]contains the i-th row[31:0]contains the j-th column- In this way, each row/column will be 32 bits, and each element will be 8 bits (since
8 × 4 = 32). - These I/Os follow the ready-valid protocol:
- At the input end → valid is expected from the end user.
- At the output end → ready is expected from the end user.
Final Transfer
- Recognized with the
done_matrix_multiplicationflag being set. - This indicates:
- The availability of the final two elements from the array.
- The chip has returned to its idle state and is ready to accept new inputs.
Getting Started
Steps 1:
Clone the repository:
Clone our repository https://github.com/meds-ee-uet/systolic-MAC.git by:
git clone git@github.com:meds-ee-uet/systolic-MAC.git
Step 2:
Install All the Required Pre-requisites:
- Modelsim / Questasim
- GTK-Wave
- install
make - gcc --> for benchmark
Step 3:
Using Makefile :
You can see the simulations in GTK-Wave using the Makefile. You have to write following command :
make TOP=module_name all
Or you can alternatively use Modelsim or Questasim as well !